Hi all, welcome to the second article of the nim-libp2p's tutorial series!
This tutorial is for everyone who is interested in building peer-to-peer chatting applications. No Nim programming experience is needed.
In this part, we will walk you through how to dial a remote peer and let the user input customized commands to do so. The full code for this part can be found in second.nim in our main repository.
Hope you'll find it helpful. Happy learning! ;)
* Note: This tutorial is divided into three parts as below:
Part I: Set up the main function and use multi-thread for processing IO.Part II(now): Dial remote peer and allow customized user input commands.Part III: Configure and establish a libp2p node.
Before you start
The prerequisite to run this example is to have two different computers for running two distinct peers. It doesn't matter which OS your computer is using.
Refer to Part III for how to run this on the same computer using two different ports.
Running the Example
Let's first take a look at how our final code will be executed.
- Enter
nim-libp2pfolder and type the following command in the terminal: (If you haven't set up the nim-libp2p repository, find instructions in our first post.)
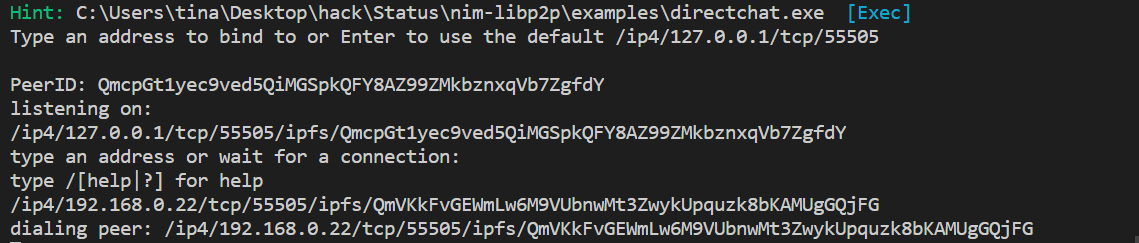
nim c -r --threads:on examples/directchat.nim2. Press Enter to use the default address to set up your peer. Your peer is running successfully if you see the following output:

3. Redo step 1 & 2 in the other computer.
4. Find the IPv4 addresses of your computers. In my case, it is 192.168.0.14 and 192.168.0.22 respectively.
ifconfig # MacOS or Linux
ipconfig # Windows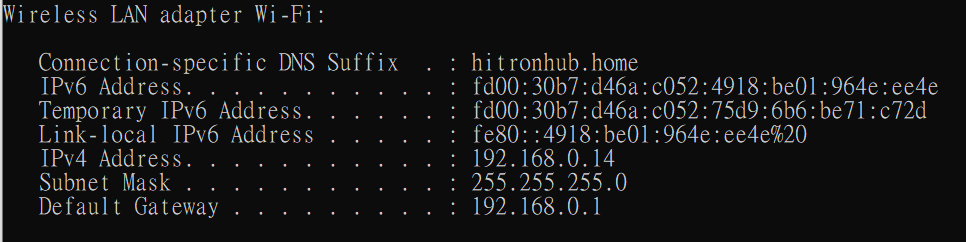

5. Send IP address and peerID to the other computer to connect to the other peer. We will use netcat to transfer our strings. Type the first command in one computer and the second one in the other.
nc -l 8000 				# listen to incoming connection on port 8000
nc 192.168.0.22 8000 	# connect to port 8000 on this IP address
Try sending the text "hi" between the two machines for testing:


Then send the peerID of this machine to the other like this:

6. Connect to the remote peer using the received information.
Type ip4/<the_other_IP>/tcp/55505/p2p/<the_other_peerID> like below:
7. Congratulations! Now you can freely send messages between the two peers. If you type in one of your computer's terminal under the above window, you will see your message appear in the other computer's terminal.
Start Coding
- First, to help us distinguish from the first code file, rename our start.nim file to second.nim (or create a copy of start.nim and rename it to second.nim).
- Import necessary modules. The first line is for the utilities functions of hash tables and strings. The third line and below is for constructing our libp2p node.
import tables, strformat, strutils
import chronos
import ../libp2p/[switch,
                  multistream,
                  crypto/crypto,
                  protocols/identify,
                  connection,
                  transports/transport,
                  transports/tcptransport,
                  multiaddress,
                  peerinfo,
                  peer,
                  protocols/protocol,
                  protocols/secure/secure,
                  protocols/secure/secio,
                  muxers/muxer,
                  muxers/mplex/mplex,
                  muxers/mplex/types]
3. Define the following constants.
const ChatCodec = "/nim-libp2p/chat/1.0.0"
const DefaultAddr = "/ip4/127.0.0.1/tcp/55505"

const Help = """
  Commands: /[?|hep|connect|disconnect|exit]
  help: Prints this help
  connect: dials a remote peer
  disconnect: ends current session
  exit: closes the chat
"""
The first ChatCodec is the chat protocol identifier (codec stands for protocol identifier). The second DefaultAddr specifies that our node will be running on TCP port 55505, a random port that is unlikely to conflict with others. It is following the Multiaddress format.
The third part denotes the output string when we type the /help command.
4. Define our chat protocol type, inherited from the LPProtocol.
type ChatProto = ref object of LPProtocol
  switch: Switch          # a single entry point for dialing and listening to peer
  transp: StreamTransport # transport streams between read & write file descriptor
  conn: Connection        # create and close read & write stream
  connected: bool         # if the node is connected to another peer
  started: bool           # if the node has started
The keyword type specifies that this is a custom type named ChatProto, ref object denotes that it is a reference type, and the of followed by means we are inheriting from LPProtocol. The "LPProtocol" stands for "Length-Prefixed Protocol", which is to send along the size of the message so that it is easy to check if the complete data has been received.
We use this custom type to store the information of the node we are going to run. The first three variables store the utility modules that our node will be using, and the last three store the state of our node. The connected information is important becasue we can only connect to a single peer in this peer to peer chat example.
Procedures that are used later by each utilities module:
switch: mount, start, stop, dialtransp: readLine, writeconn: close, readLp (length-prefixed), writeLp
5. Create a procedure to dial a remote peer.
proc dialPeer(p: ChatProto, address: string) {.async.} =
  let
    multiAddr = MultiAddress.init(address).tryGet()
    # split the peerId part /p2p/...
    peerIdBytes = multiAddr[multiCodec("p2p")]
      .tryGet()
      .protoAddress()
      .tryGet()
    remotePeer = PeerID.init(peerIdBytes).tryGet()
    # split the wire address
    ip4Addr = multiAddr[multiCodec("ip4")].tryGet()
    tcpAddr = multiAddr[multiCodec("tcp")].tryGet()
    wireAddr = ip4Addr & tcpAddr

  echo &"dialing peer: {multiAddr}"
  p.conn = await p.switch.dial(remotePeer, @[wireAddr], ChatCodec)
  p.connected = true
  asyncSpawn p.readAndPrint()
The above code will split the multiaddress properly in order to both communicate the peerId and the actual network address to the switch dial.
also prints out the multiaddress of the peer we are connecting to by using echo. The & prefix allows us to also use the multiAddr varaible with {} in the output string. Then, returns a Connection type after dialing the peer and successfully connecting to it. The connected state is thus set to true and the readAndPrint task is spawned.
6. Create a procedure to read for chat messages sent from another peer.
proc readAndPrint(p: ChatProto) {.async.} =
  while true:
    var strData = await p.conn.readLp(1024)
    strData &= '\0'.uint8
    var str = cast[cstring](addr strdata[0])
    echo $p.switch.peerInfo.peerId & ": " & $str
    await sleepAsync(100.millis)
We use while true to continuously listen to messages from the connected peer every 100 milliseconds. Then, we cast the message to string type and print it to the console (adding a null terminator as it comes from just a byte array).
7. Create a procedure to write chat messages and execute commands for connecting and disconnecting to remote peer.
proc writeAndPrint(p: ChatProto) {.async.} =
  while true:
    if not p.connected:
      echo "type an address or wait for a connection:"
      echo "type /[help|?] for help"

    let line = await p.transp.readLine()
    if line.startsWith("/help") or line.startsWith("/?") or not p.started:
      echo Help
      continue

    if line.startsWith("/disconnect"):
      echo "Ending current session"
      if p.connected and p.conn.closed.not:
        await p.conn.close()
      p.connected = false
    elif line.startsWith("/connect"):
      if p.connected:
        var yesno = "N"
        echo "a session is already in progress, do you want end it [y/N]?"
        yesno = await p.transp.readLine()
        if yesno.cmpIgnoreCase("y") == 0:
          await p.conn.close()
          p.connected = false
        elif yesno.cmpIgnoreCase("n") == 0:
          continue
        else:
          echo "unrecognized response"
          continue

      echo "enter address of remote peer"
      let address = await p.transp.readLine()
      if address.len > 0:
        await p.dialPeer(address)

    elif line.startsWith("/exit"):
      if p.connected and p.conn.closed.not:
        await p.conn.close()
        p.connected = false

      await p.switch.stop()
      echo "quitting..."
      quit(0)
    else:
      if p.connected:
        await p.conn.writeLp(line)
      else:
        try:
          if line.startsWith("/") and "ipfs" in line:
            await p.dialPeer(line)
        except:
          echo &"unable to dial remote peer {line}"
          echo getCurrentExceptionMsg()
8. Create a procedure to read and write messages and commands simultaneously.
proc readWriteLoop(p: ChatProto) {.async.} =
  await p.writeAndPrint()
In this case we will block the execution, as you can see asyncSpawn was not used.
Conclusion
Now you have learned how to dial a remote peer, and how to read and execute the user input commands simultaneously.
In the next tutorial, we will complete the remaining part of this direct chat example, which is about establishing a libp2p node. Please stay tuned!


